found
3.1 Baigoo, the Search Engine in Simbound
In the previous section, you learned how to set up pages for your website. In this section of the guide, you will learn how to increase the visibility of your website pages in two ways: by improving your website's ranking in search results compared to other websites, and by displaying contextual ads using Baigoo, the search engine in the simulation.
You may have noticed that each page on your website has a progress bar next to it. This indicates the degree to which you have used the many content sections available for your web page. A well-designed page with informative content will generally produce better exposure and attract more traffic as a result of your website's relative position to other websites in the Baigoo search results pages. As a direct result of better placement of your website, you can generally expect to receive more organic (free) traffic, which is more diverse in terms of the originating audience and their preferences.
Search engines can change the rules of how content is ranked on their platforms, so you may want to consider additional methods for gaining exposure. One of them is paid advertising. In the simulation, you will work with placing different ads on the search results pages of Baigoo. You will learn how to do this step by step in the following subsections of the guide.
If at any time you find that you do not understand a specific term related to search engine advertising (sometimes referred to by the following acronyms: SEA or Pay-Per-Click/PPC), please use the chat feature to ask the meaning of a term. You can also learn more by searching for these terms online. There is a dynamic tutorial available within the app that guides users into all the options found on the screen – this can be accessed by clicking on the lightbulb symbol in the top right of the screen.
3.2 Keyword Research
A search engine advertising campaign will almost always include keyword research. Before you create your first ad campaign, take some time to familiarize yourself with the keyword level data in the simulation. Keyword research is also used when looking for ideas for writing content or articles for the website. You can access the Keyword Research facility either through the Planner or through the Ads sections of the simulation.
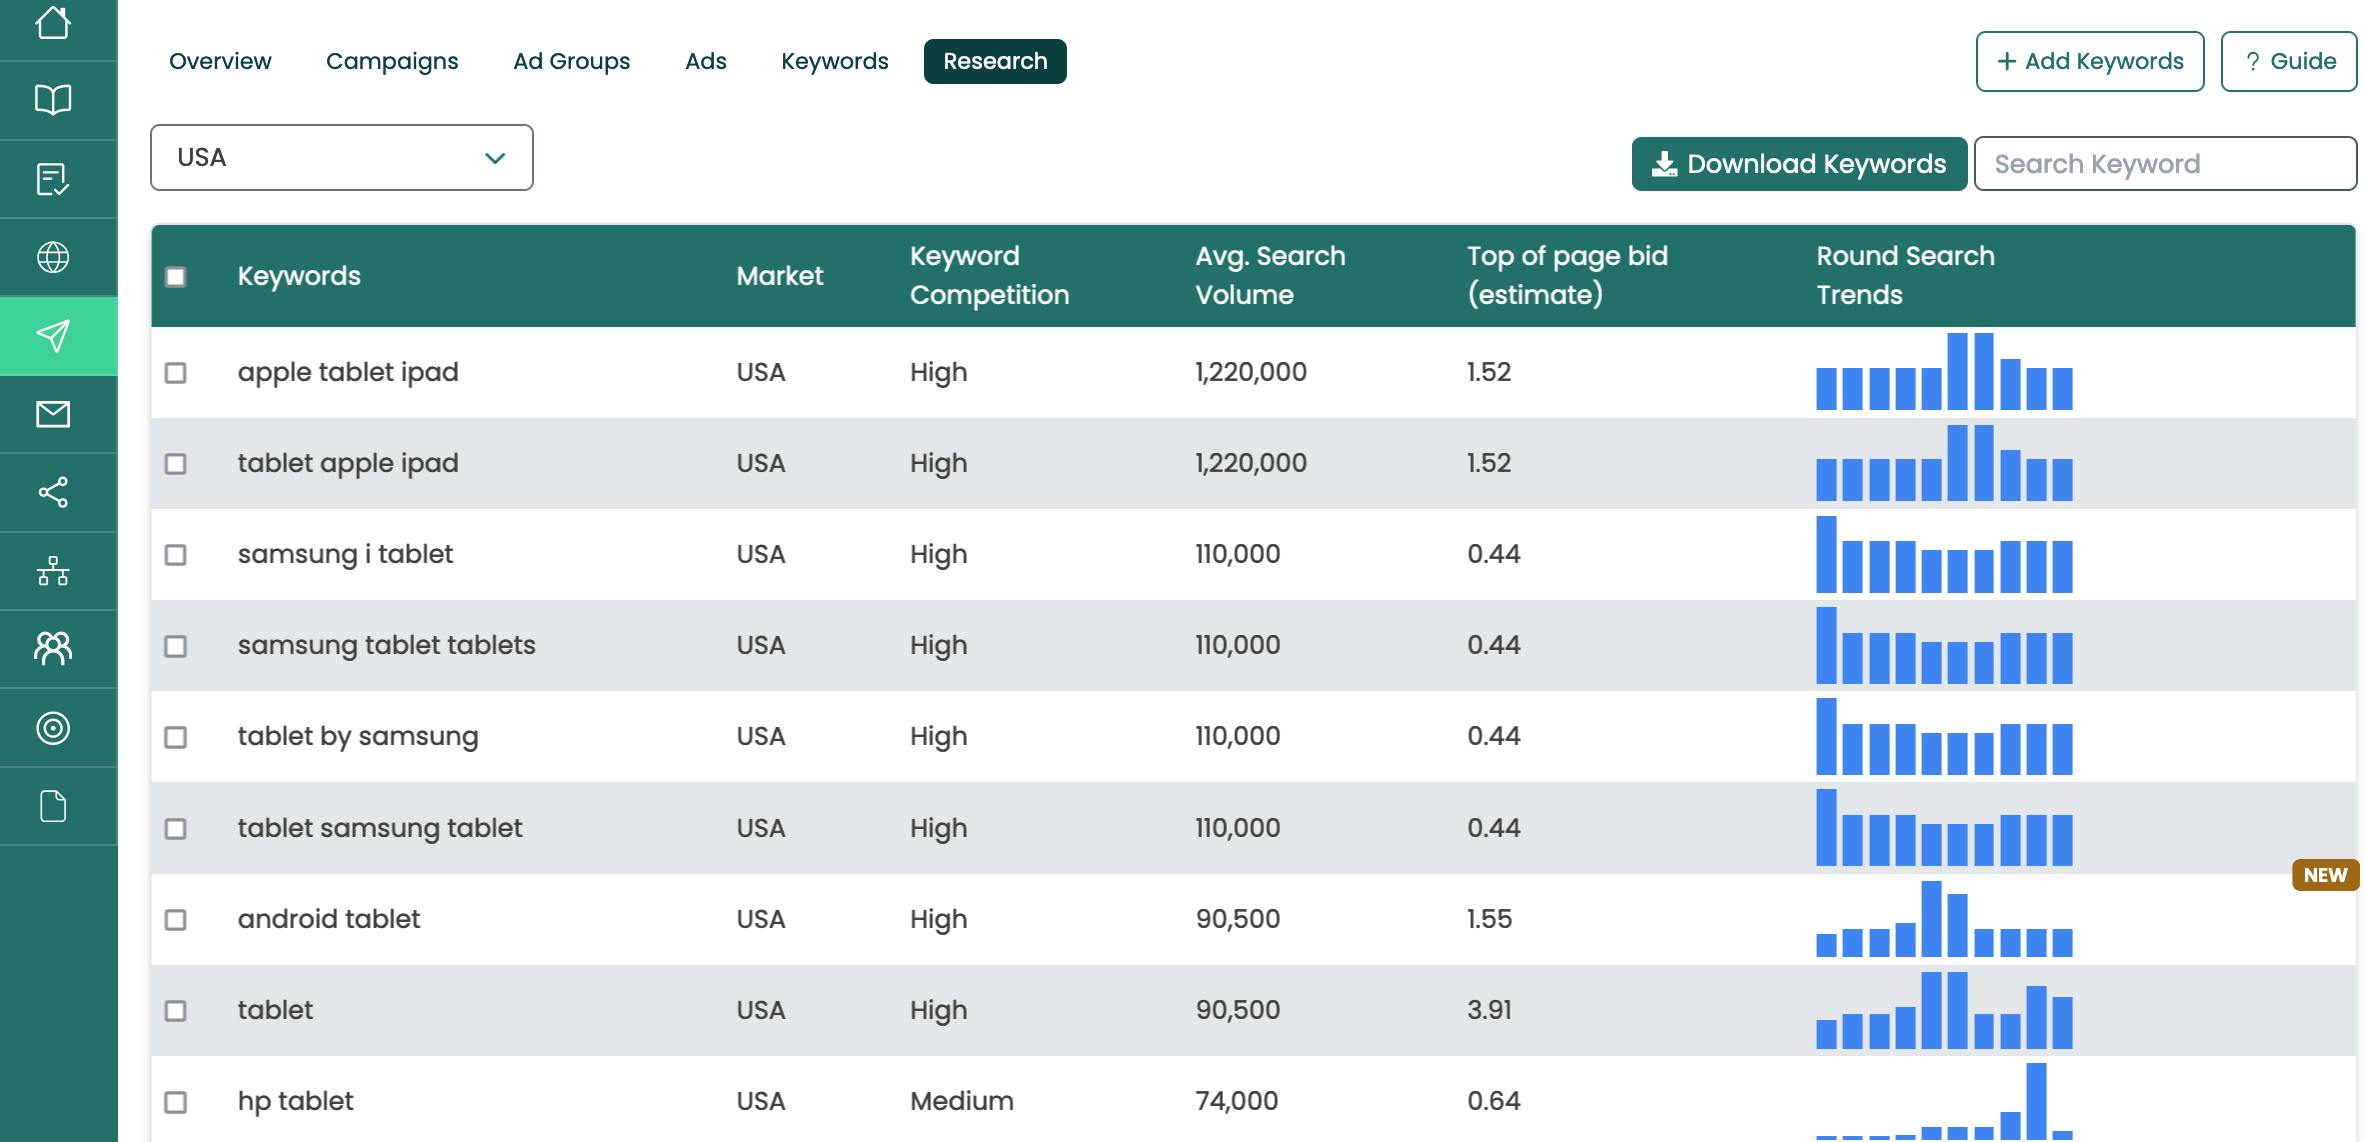
Since your main goal is to get as many responses as possible from the virtual visitors to your site, the Research section is helpful because it displays various data that will help you estimate how popular a search phrase is and how engagement would change over time, and you could use this information to determine the budget allocation of your ad campaign or even make changes by adding or removing new products from your website. Make sure you understand each data point associated with each keyword as it is presented here.
Note the market to which the keyword data belongs, the level of competition (how many other advertisers are targeting this keyword), the average search volume, which indicates how popular each keyword is compared to other keywords, the approximate cost per click (CPC) amount you will have to pay if you want to advertise using the keyword, and the seasonality of consumer behavior when searching for certain products or services, which is displayed under the round search trends column.
You can also filter keywords for specific terms or download the entire keyword set for further analysis.
Once your first campaign is set up, you will be able to add more keywords to your campaign from the list of keywords found in the Research section. Please note that each keyword can only be part of one campaign at a time and for each different market. This should make it easier to understand the results and write reports.
3.3 Ad campaigns
Each ad campaign requires the following minimum components to function: a linked landing page containing the product being advertised, at least one keyword, ad copy or creative for the shopping or retargeting ads, and the correct budget and cost-per-click parameters. All campaign components should be monitored and updated as the simulation progresses or if you make changes to any of the components.
To make campaigns easier to manage, it is a good idea to create campaigns based on a specific theme or purpose. Some ideas are: a campaign to promote a specific product or to reach a specific customer group or market, or a campaign to achieve specific results such as number of visits to the website or number of conversions.Ranking campaigns can help when managing multiple campaigns and monitoring progress and improving simulation results.
Create a search advertising campaign
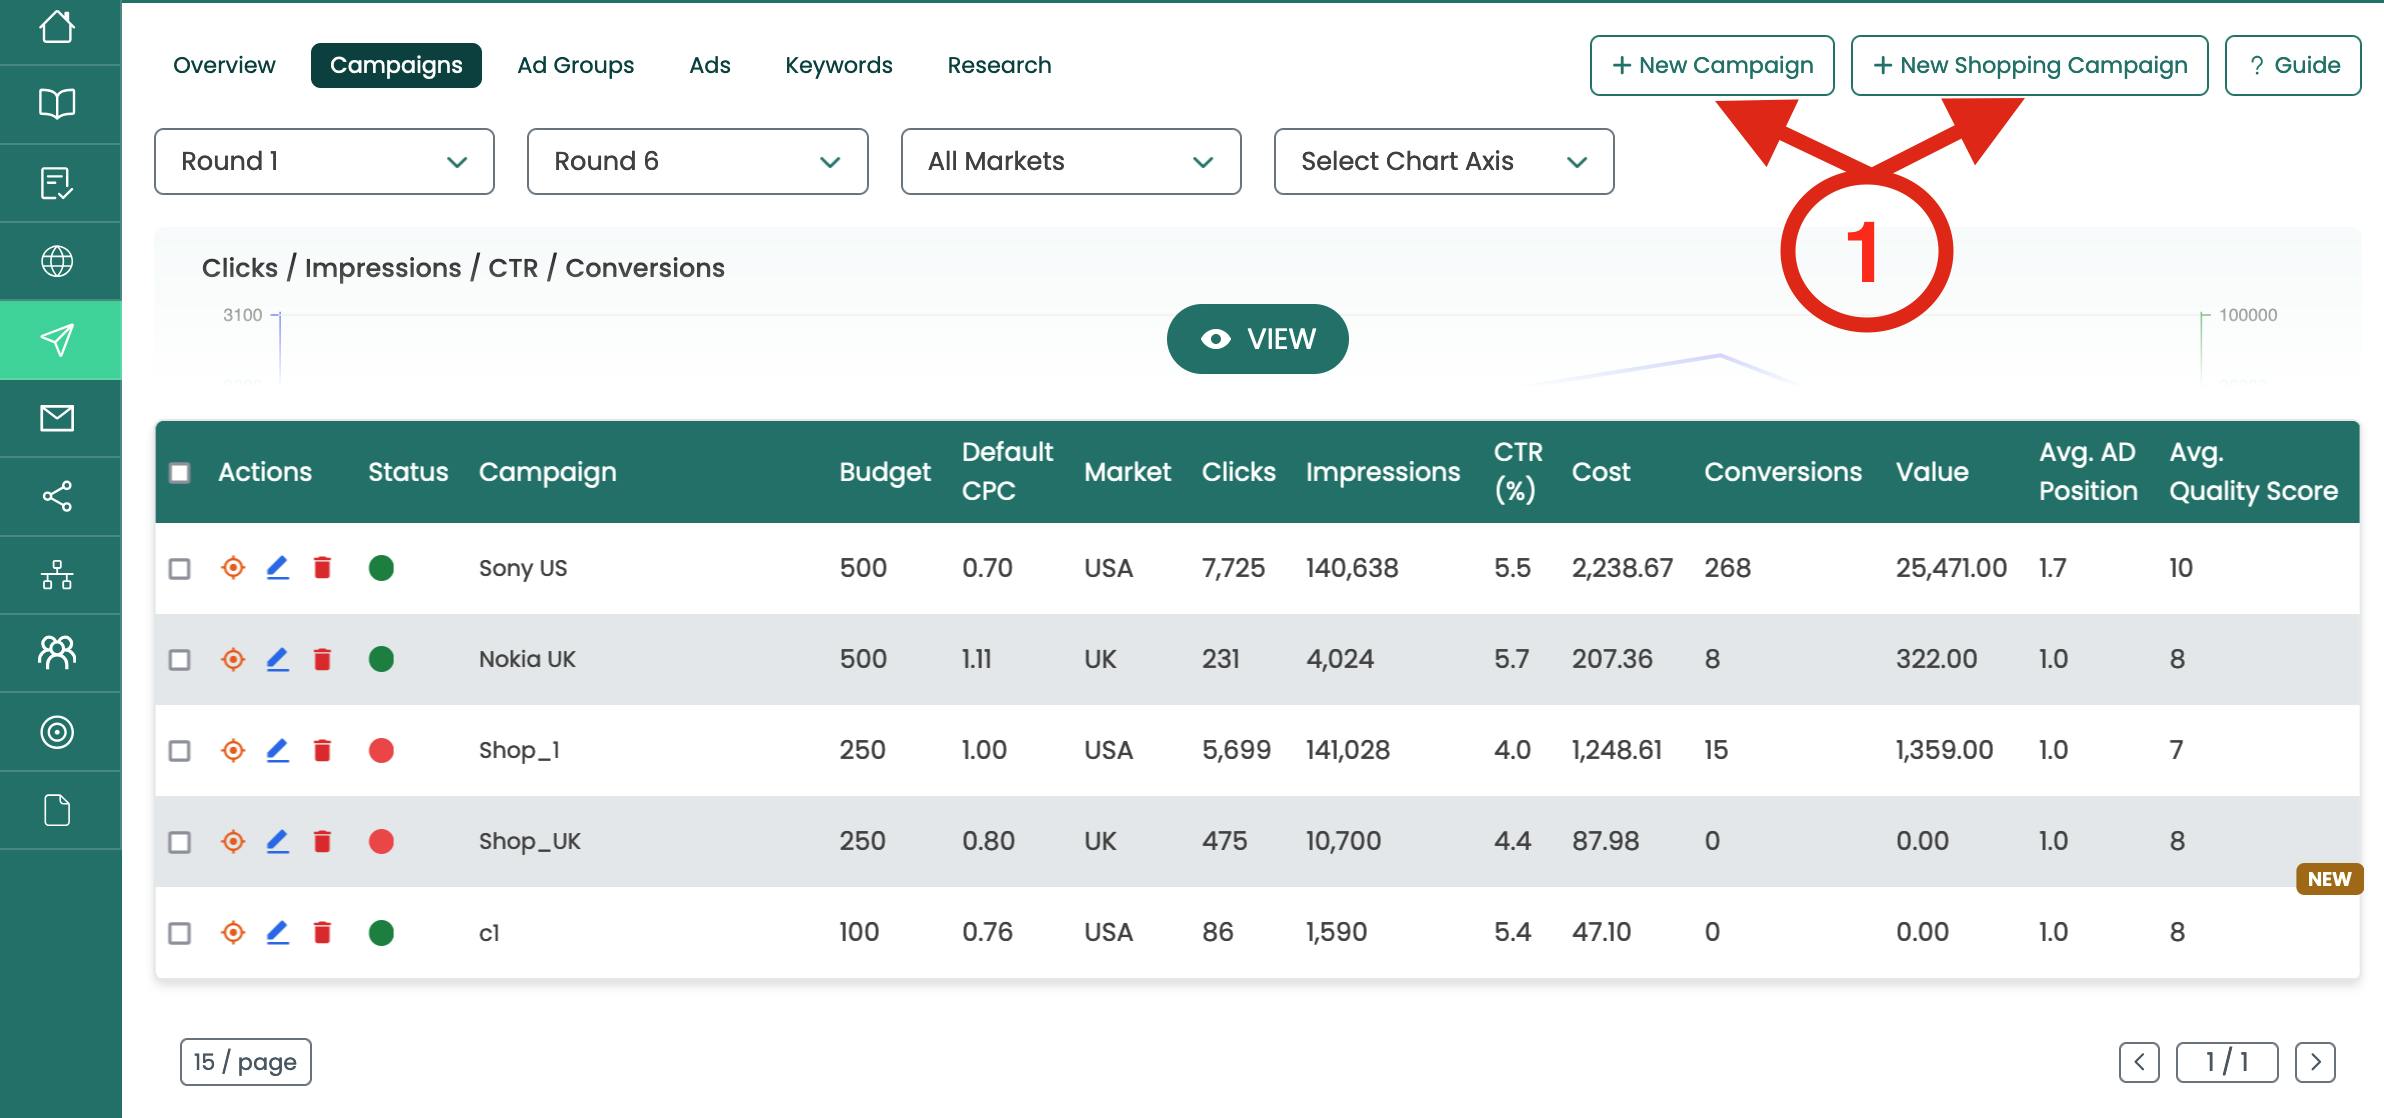
1. Click on the "Ads" section from the main dashboard or the vertical left menu. Then click on the "Campaigns" tab and launch the "New Campaign" functionality by clicking on the button located near the top of the screen.
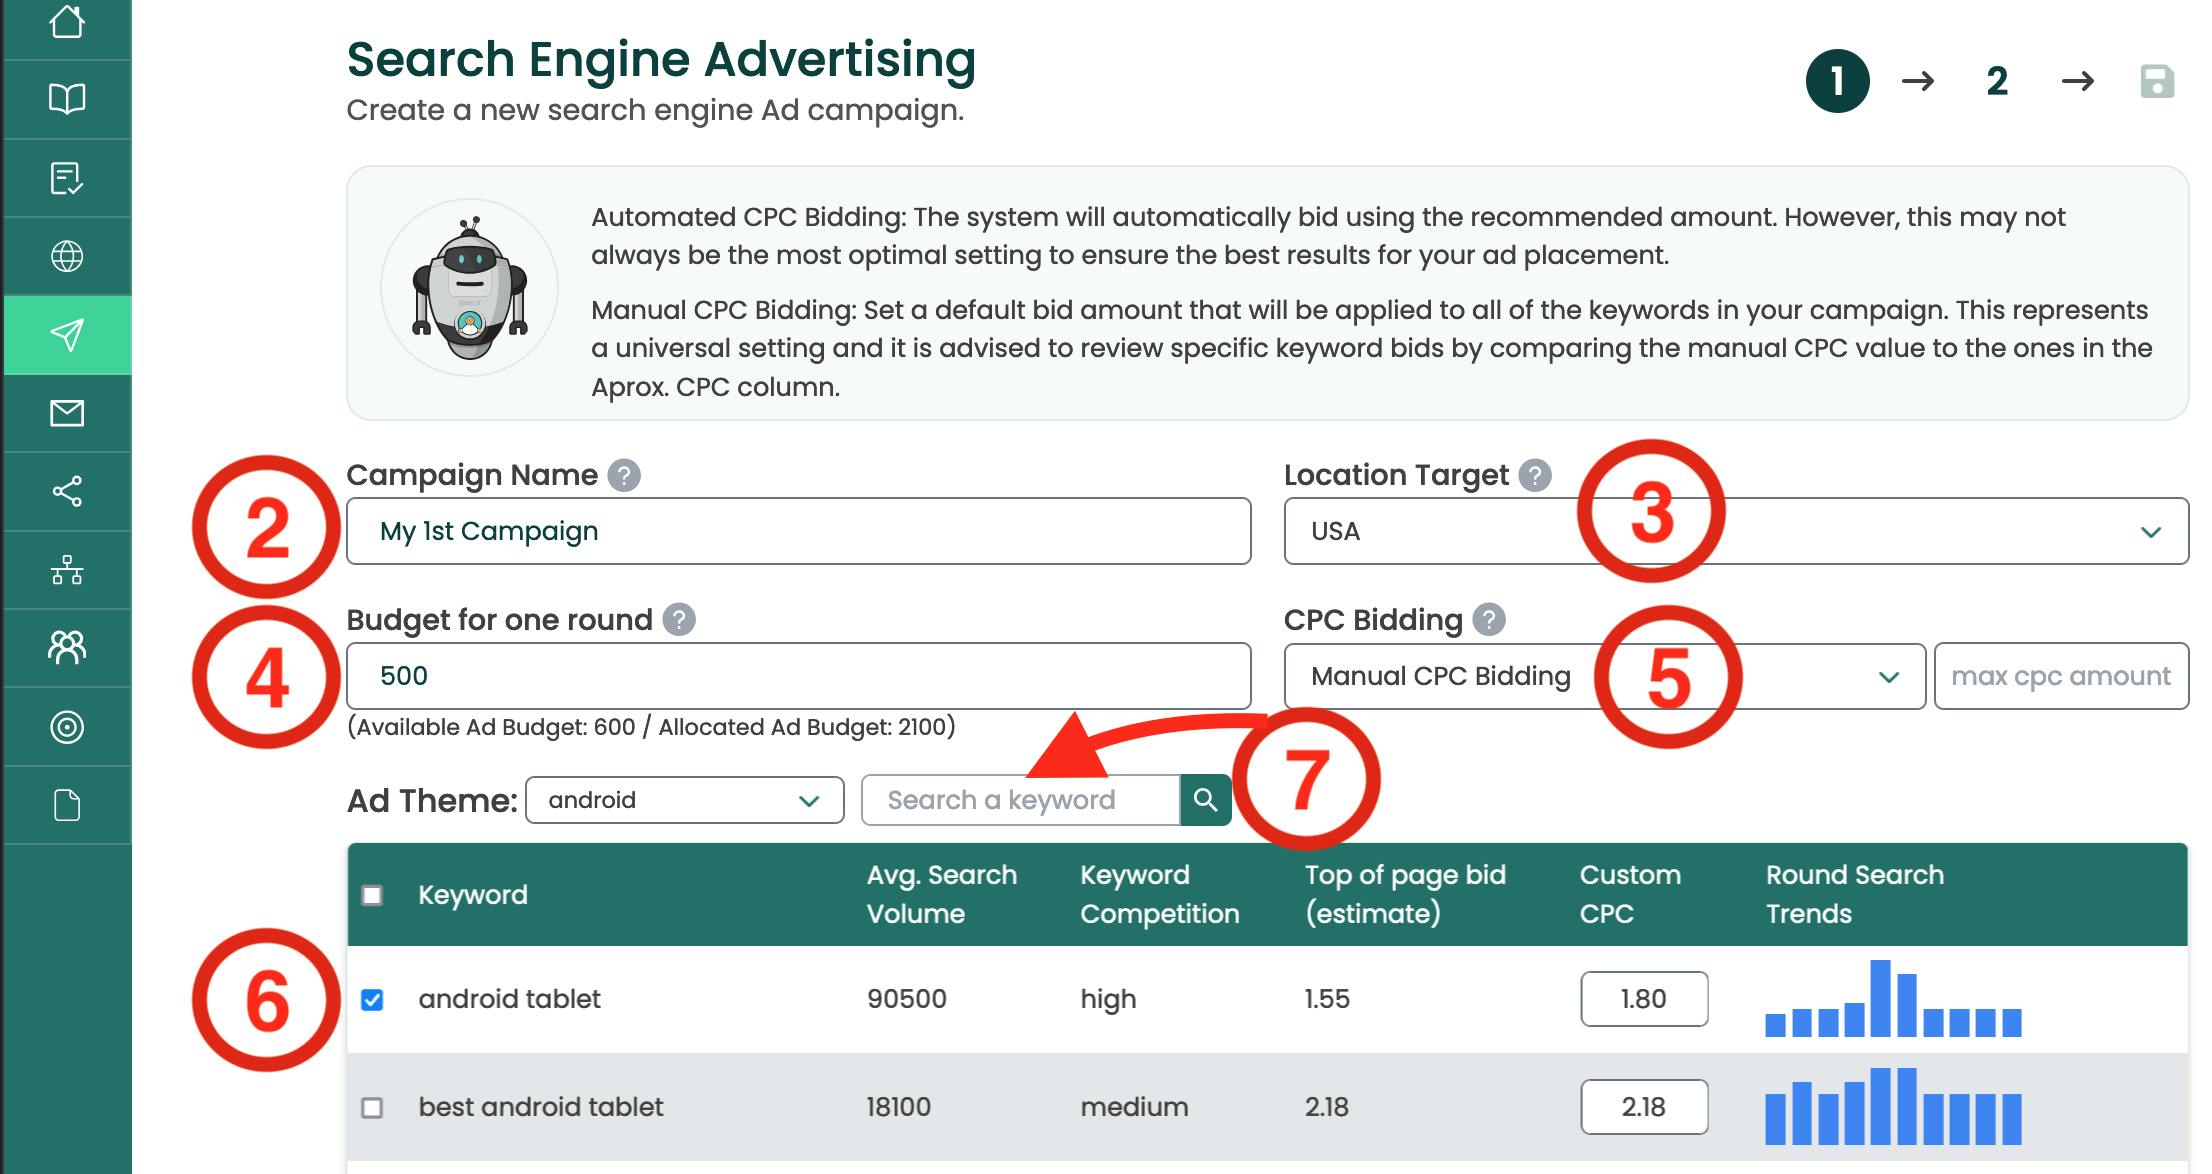
2. Name the campaign. This name will appear throughout the other sections of the Ad Simulation. Choose a name that is easy for you to remember and that points to a specific theme or goal. You can change the name of the campaign later as it progresses.
3. Location (Audience) of the campaign (this may vary from scenario to scenario). Once you select a market, this will load the keyword data for that market, grouped under closely related content themes.
4. Setting the campaign budget
This is the amount of money you want this campaign to spend in each round. The budget is consumed by the virtual visitors who click on your ads. Once the budget is used up, the system will stop showing the ads. The budget value you set in this step will continue to be the default budget for this particular campaign in all future 4 rounds. This means that at the beginning of the next round, this budget will be allocated by default, so you will not need to repeat this step. It also means that if you set the entire budget to just one (initial) campaign then you will need to re-allocate the budget by decreasing the budget value for the initial campaign in order to free up the budget required for the set up of additional campaigns.
It is recommended that you try to spread the total available budget across multiple campaigns. In other words, you should not allocate your entire available budget to just one ad campaign, (E.g. especially if this is the first one you are setting up and not entirely sure of the settings you are making). Try setting up several campaigns to compare their performance. The system will display the available budget as well as the budget that has already been allocated to other campaigns.
5. CPC Bidding
Manual CPC bidding allows you to enter a bid that will be the default value for all keywords in your campaign. This value is a global setting, which means it will be applied to all keywords, so you should check each keyword bid below by comparing the bid you entered to the value in the Top of Page Bid (Estimate) column. You can also find this value on the Keyword Research page. Checking bids and making any other adjustments to campaign settings should be completed before the round results are calculated.
If you are not sure what value to use for bids, you can select the "Automatic CPC bidding" checkbox. Be aware that in some cases this is a sub-optimal decision and does not guarantee optimal ad placement and results.
6. Adding keywords to your campaign
Select one of the ad themes below. Once you select an ad group theme, you will see information such as search volume, competition level, and approximate cost per click (CPC) for each keyword belonging to that particular theme.
Clicking the checkbox in the column header will select all keywords for that particular theme and add them to the campaign. You can add keywords from more than one theme – this will create additional ad groups. If a keyword is not available for selection, it is because it is already part of an existing campaign. If you want to add the keyword to the new campaign, remove it from the existing campaign first.
If you don't know which keywords to include at this point, it's a good idea to have a broad selection so you can test the response rates that different keywords generate. You can add or remove keywords even after you have created the campaign and the simulation is running. When done you should click “Next” to advance to the Ad creation step.
7. Finding new keywords (optional)
You can search for new keywords to add to your campaign by entering terms closely related to the scenario topic. One word keywords work best.
How the budget works in the simulation:
Any unspent budget in a round will not carry over to the next rounds of the campaign. This is considered a missed opportunity and can be caused by one or more of the following: not having enough keywords in the campaign, having keywords with low search volume, having too low a value for the CPC bid setting, or achieving a low quality score for your ads due to suboptimal ad copy and/or poor landing page experience.
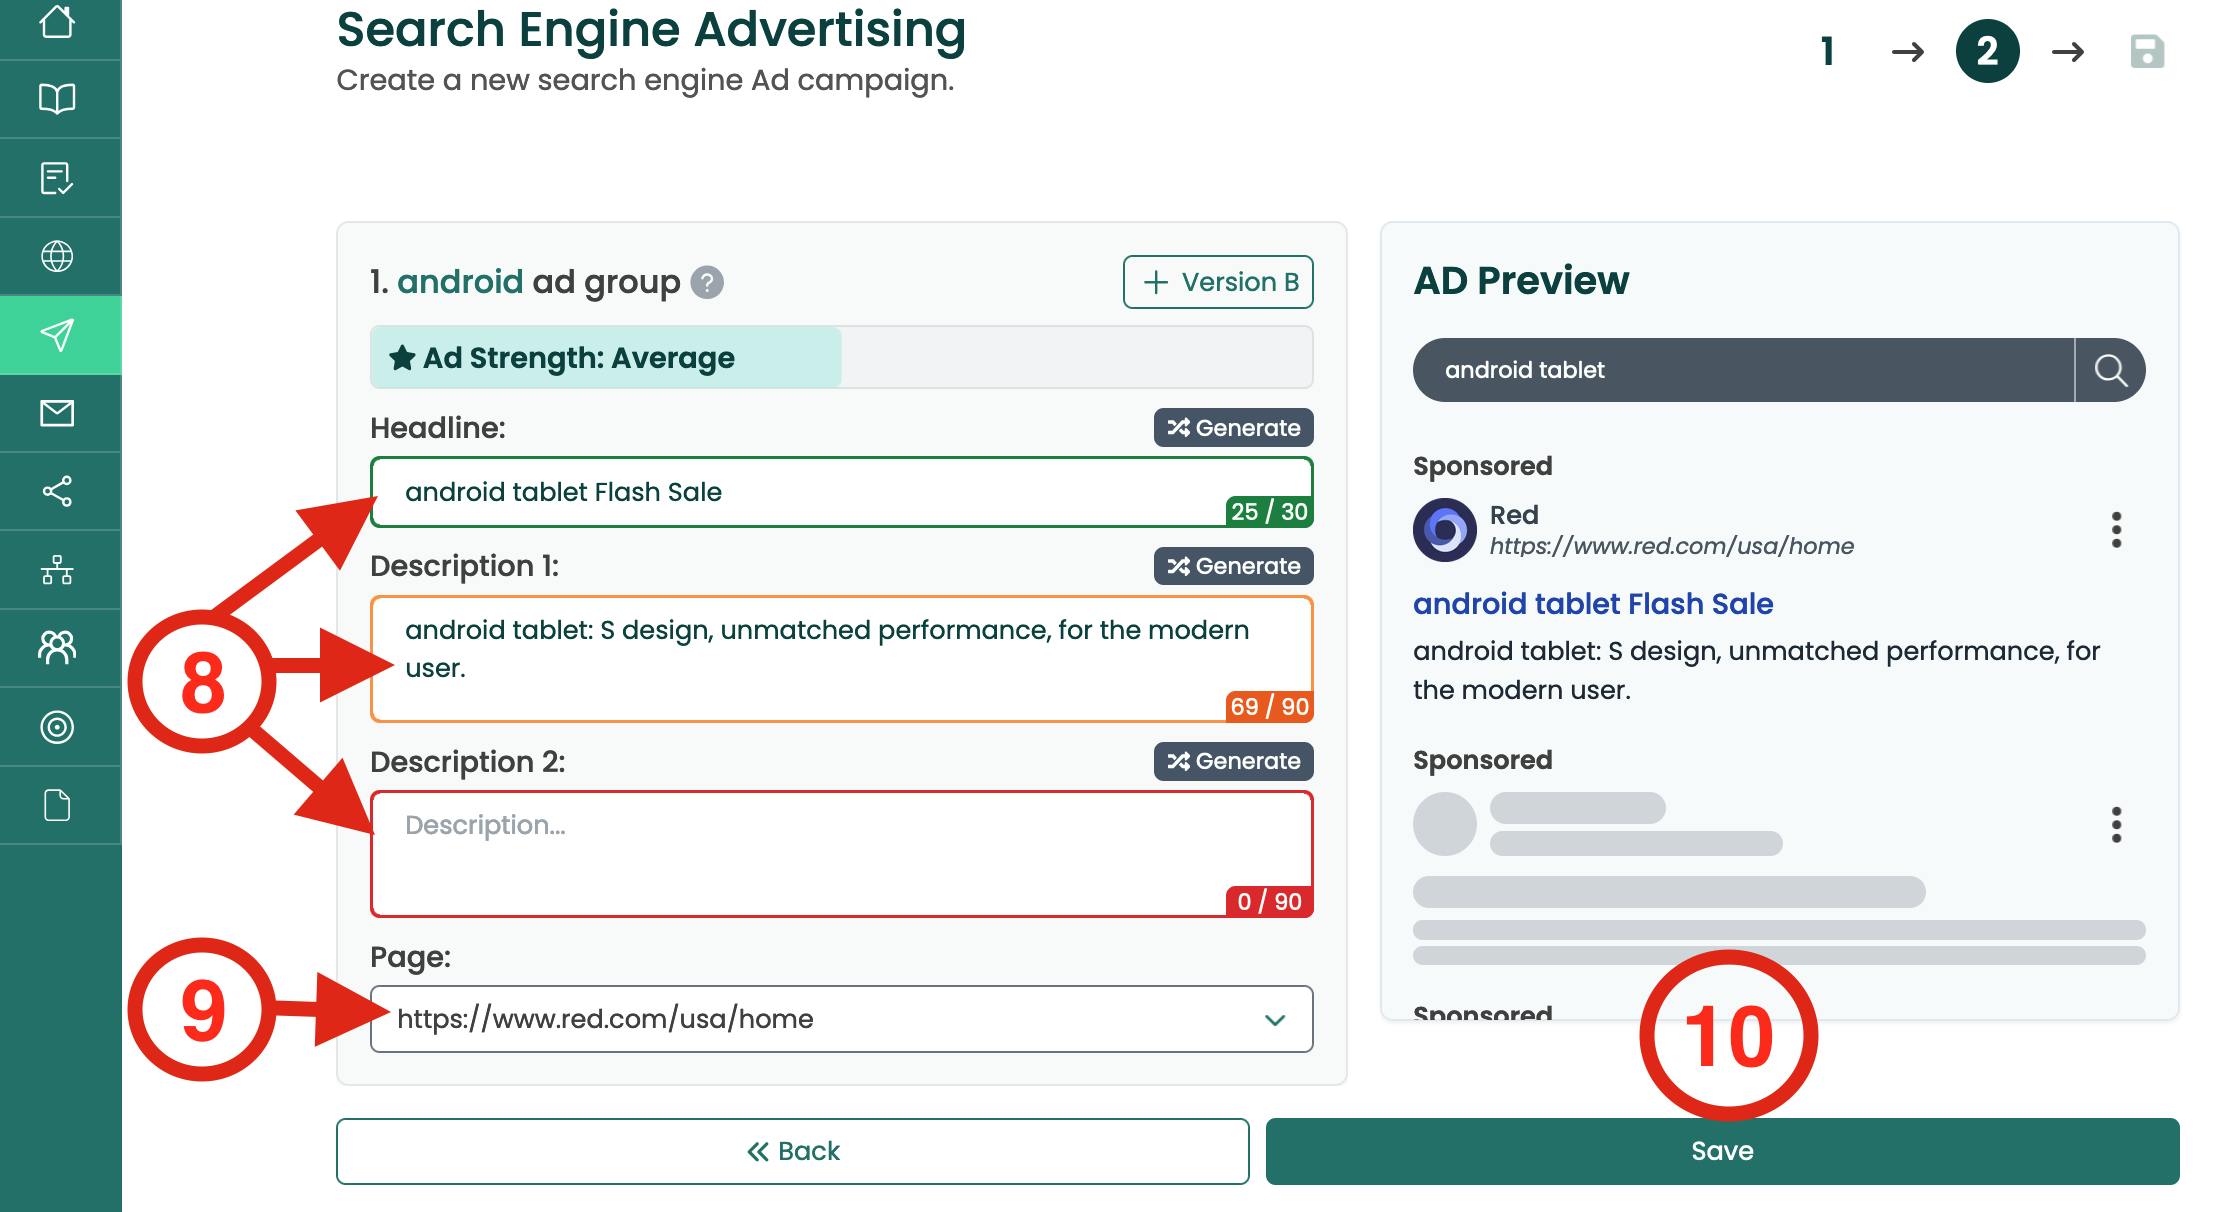
8. Write the text for the ads
You can use the keywords you selected earlier as a starting point for creative ideas. You can also generate an ad text quickly by pressing on the “Generate Ad” button. In either case try to communicate the value a potential customer can expect if they visit the site by clicking on the ad. An ad that contains the exact match type of a keyword (or search phrase) will result in a higher engagement rate.
For best results fill out the entire space for the headline and the two description lines and avoid any spelling mistakes or excessive use of any symbols, acronyms or punctuation marks.
Tip: You can make use of the {keyword} tag in every line of the ad to help speed up the writing of ads. If you include this tag in the headline or the description lines the system will search for the best keyword to include in the place where the tag is present.
9. Select the ad destination URL
You will then have to select the most appropriate destination URL (page) for your ad, which is normally a landing page from where visitors will be able to find information about the products or services that are being advertised. By default, when setting up ads for different themes or products the system will try to link each individual ad to a different landing page that contains information about the product or theme. This feature will only work if you have previously set up pages which contain a single product. Once the campaign is set up you should go to the Ads section and review the ads.
10. Finally click “Save” in the top right corner to confirm the settings for your campaign decisions. You do not need to submit your decisions in any other way. The results of your campaign will be displayed when the current round deadline is reached, or when you choose to ‘Run the Simulation’ – if that option is made available to you.
Note: You will be able to edit the settings of the campaign even once the campaign has produced results by going to each of the sections for every Campaign component.
How to monitor ad campaigns
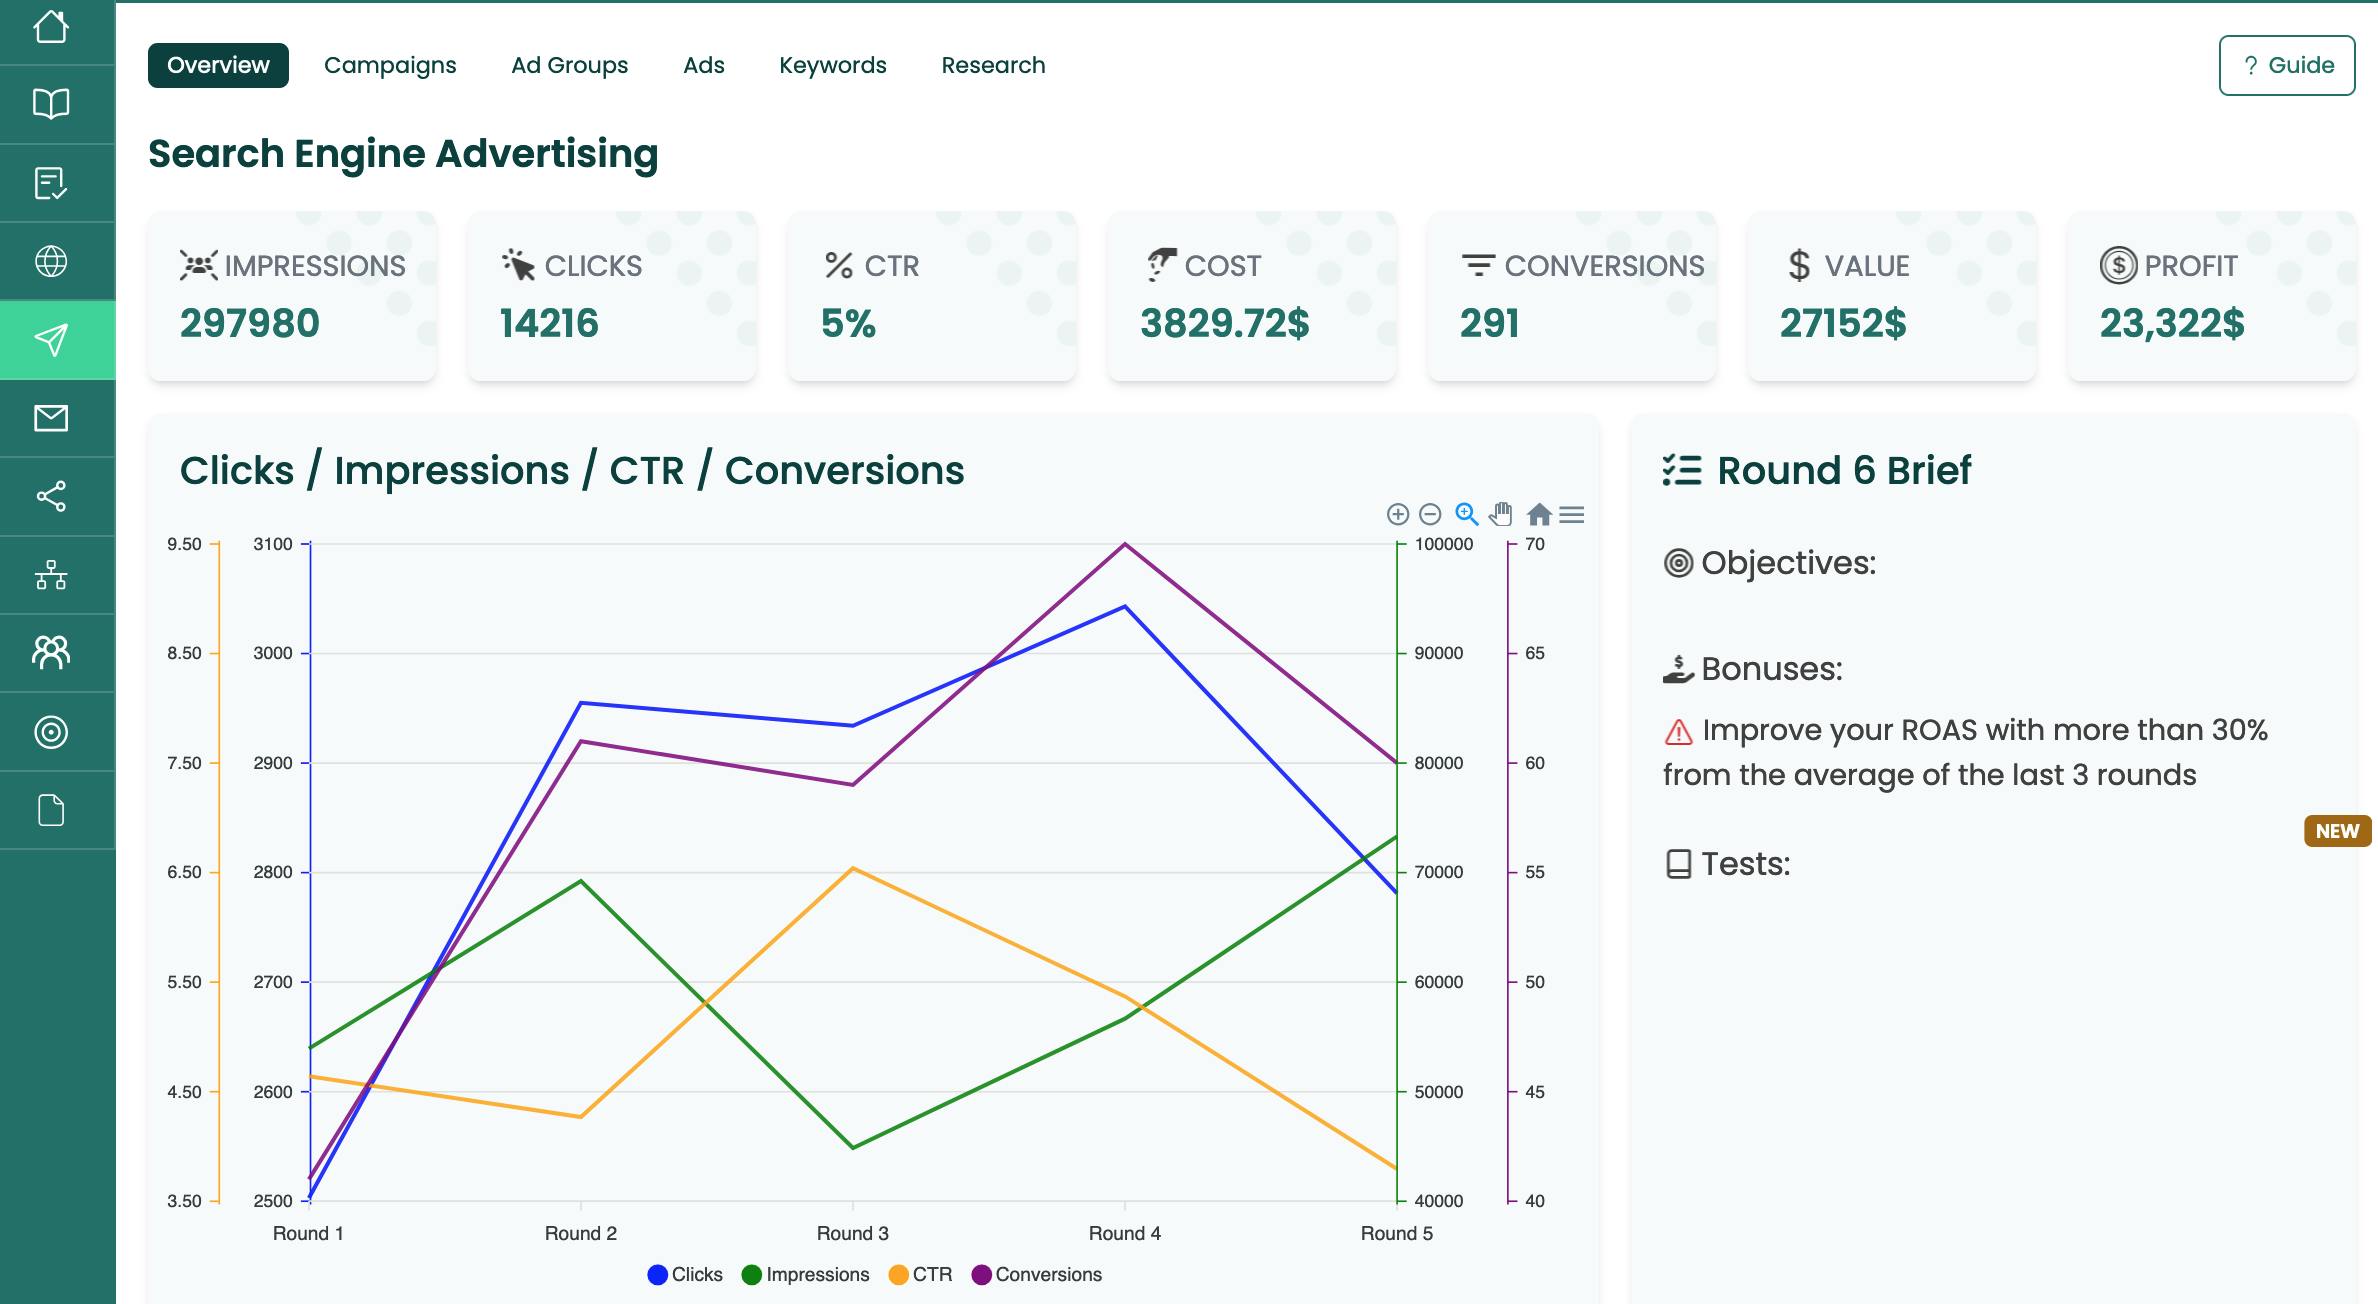
To evaluate the results of the ad campaign over time, you will need to refer to the data presented in the round progress chart and the data table found below.
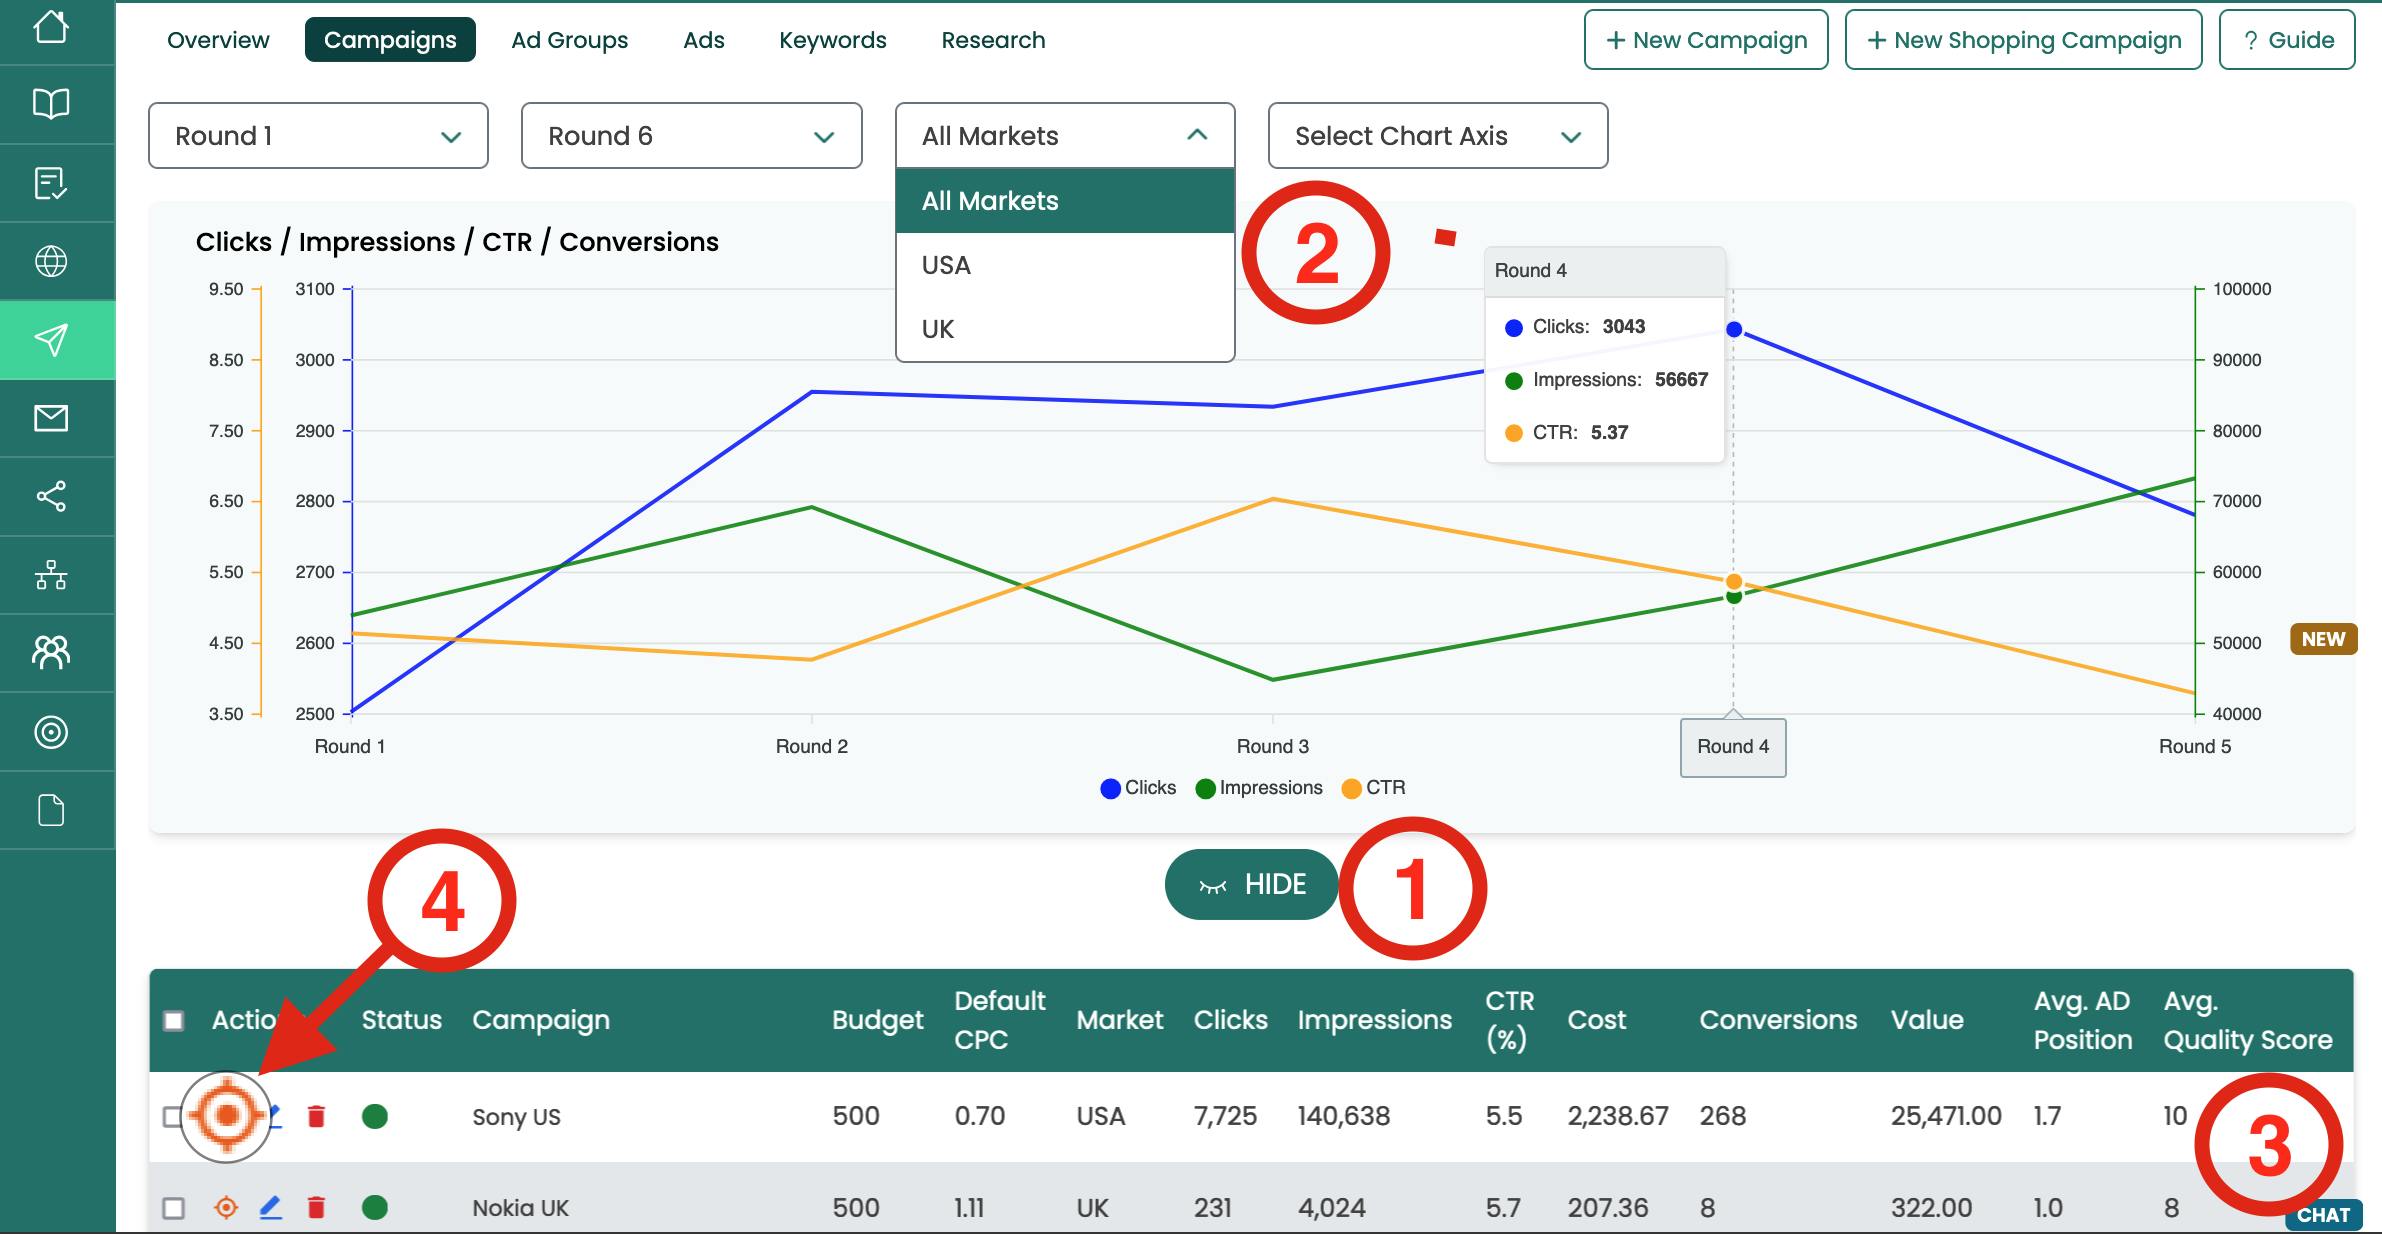
1. The full chart can be shown or hidden at the press of “Show/Hide Chart” The layout and data of the report is similar for each of the four subsections of the Ads Simulation: Campaigns, Ad Groups, Ads, and Keywords. The graph displays information about the accumulated clicks, impressions, clickthrough rate (CTR) and number of conversions. By default the visual chart will plot the impressions and clicks.
2. You can segment the data in the report and choose to view the results of the campaign over one or more rounds for a market and only for a selected campaign and all its components.
3. The data table displays additional data: cost, average paid CPC, average ad position, the gross profit value generated by the campaign, the average position of your ad in the search results page, and the average quality score of the keywords in your campaign.
4. If you click on the View/Target icon next to each campaign then you can move through the different sections – Ad groups, Ads, Keywords, etc. – and the system will display only the components of the selected campaign. - This makes it easier to identify decisions that should be improved or make adjustments more quickly especially if you have a lot of campaigns or campaign components.
Ad Campaign operations: Edit, Pause, Enable or Delete campaigns
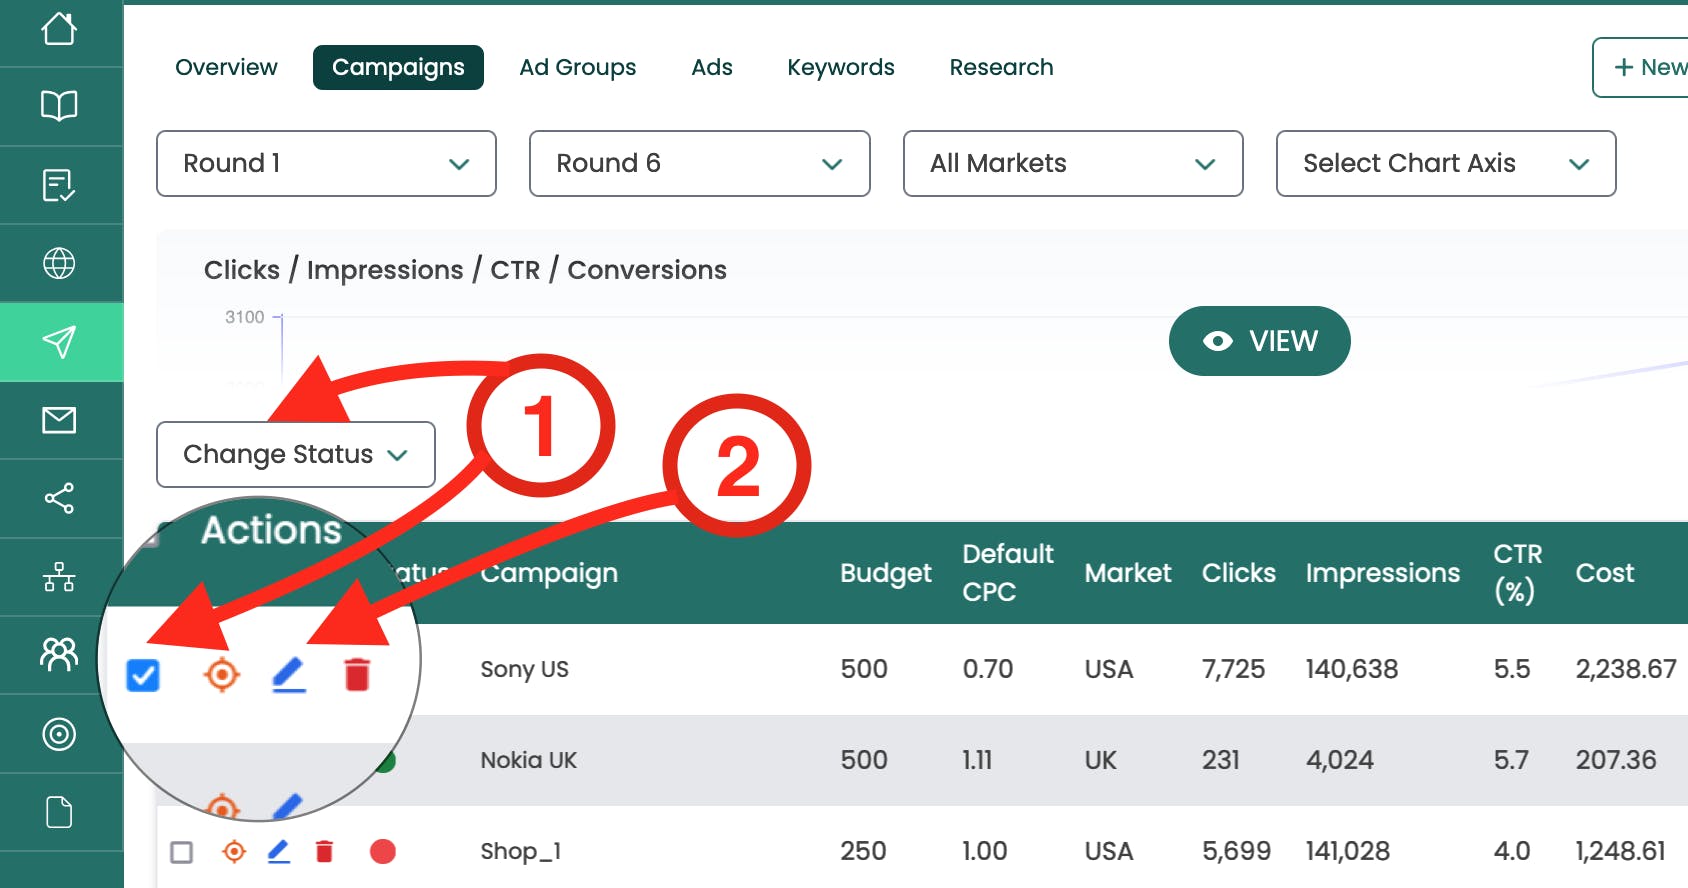
The simulation allows you to review and adjust the settings of each campaign and its components. This is an important and recurring decision that you will want to make each round if you want to improve your results. On the Campaigns page in the Ads section, click one of the following options for each campaign for which you want to change the settings. Campaigns are listed in the data table below the progress graph.
1. By clicking the Select box in the first column of the Campaigns table, you can select one or more campaigns, and then use the Status drop-down menu that appears above to either enable, pause, or delete the campaign selection. Enabling, Pausing or Deleting a campaign will apply to all of the campaign components.
2. The following campaign settings can be changed Name, Budget and Default CPC bid even if a campaign is running. Click the Edit (pencil) icon to make changes to a running campaign. Note that the CPC value setting will overwrite the corresponding CPC value for all keywords that are part of the campaign (see more on this rule below). The same operations can be applied to Ad Groups, Ads and Keywords of which you will learn more in the following pages of the guide.
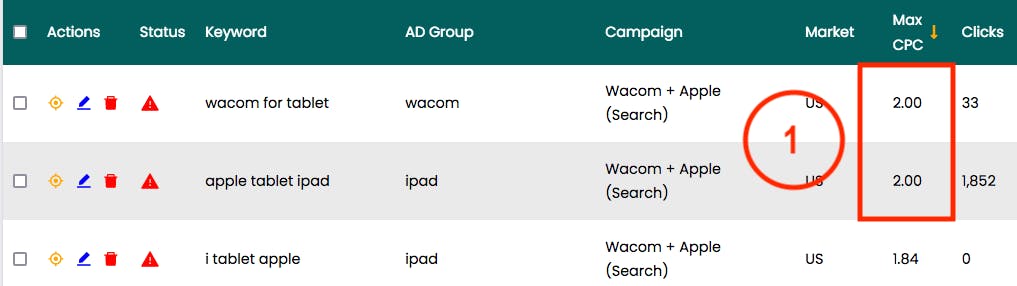
Default Campaign CPC Overwrite Rule:
The default CPC value for a campaign will match all the keyword CPC values to the default campaign CPC. If the keywords in the campaign already have a lower CPC than the new default value, the existing CPC will remain the same. This lets you set a global CPC value while adjusting certain keywords to have a lower CPC.
In the following example the default campaign CPC value was set to 2.00 from an initial value of 2.15 for a campaign. This change was only applied to the first 2 keywords and not to the 3rd, which already had a Max CPC value lower than 2.00.
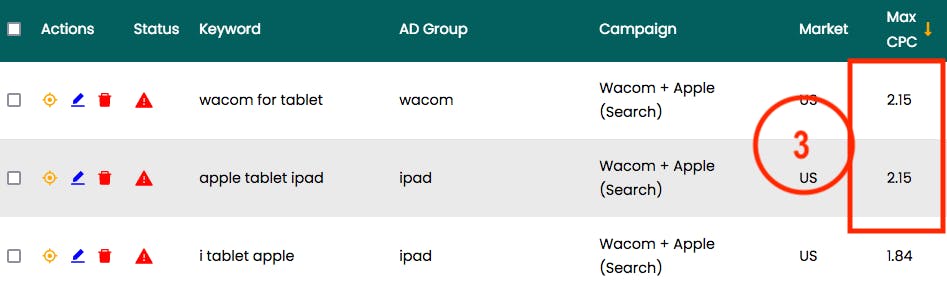

This rule has the role to preserve the CPC settings that were made in advance to the keywords and will work in the same manner when changing the CPC setting of an Ad group of which you will learn more in the next chapter.
3.4 Ad Groups
The management of multiple ads with different themes is easier with Ad groups (also called Ad assets). Ad groups are created during the initial campaign set up and can be added later on to your campaigns. There needs to be an existing ad campaign before you can add a new ad group in the Ad Groups section of the simulation.
Set up an ad group
1. Click on the “Ads” icon from the dashboard then go the “Ad Groups” tab. The “New Ad group” button in the top right of the screen will launch a 2-step utility that allows adding new ads to the campaign.
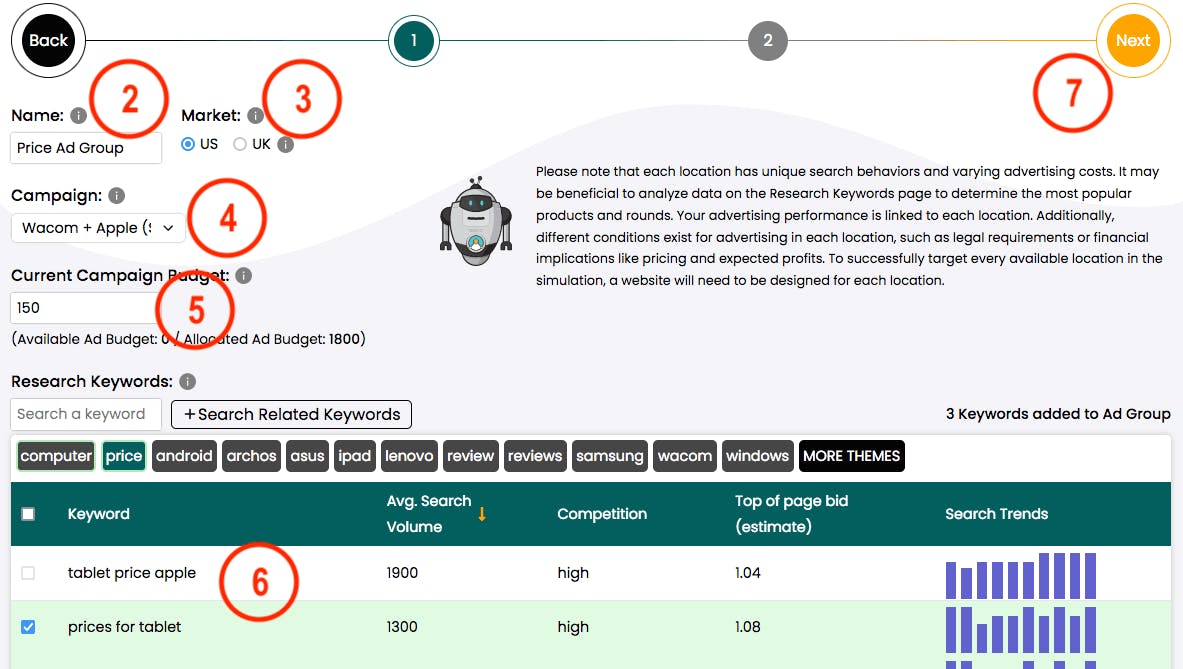
2. Name the new ad group This is for your own internal reference only.
3. Choose the market which this ad group will be served to.
4. Select the campaign to which the ad group should be added to
5. Review the campaign budget. The next step is to add more keywords to your current campaign, which will likely require a higher budget allocation due to the increased competition for keyword budget resources triggered by searches and potential clicks.
6. Add the keywords that will trigger the new ad and add them one-by-one to the new ad group.
7. Click Next
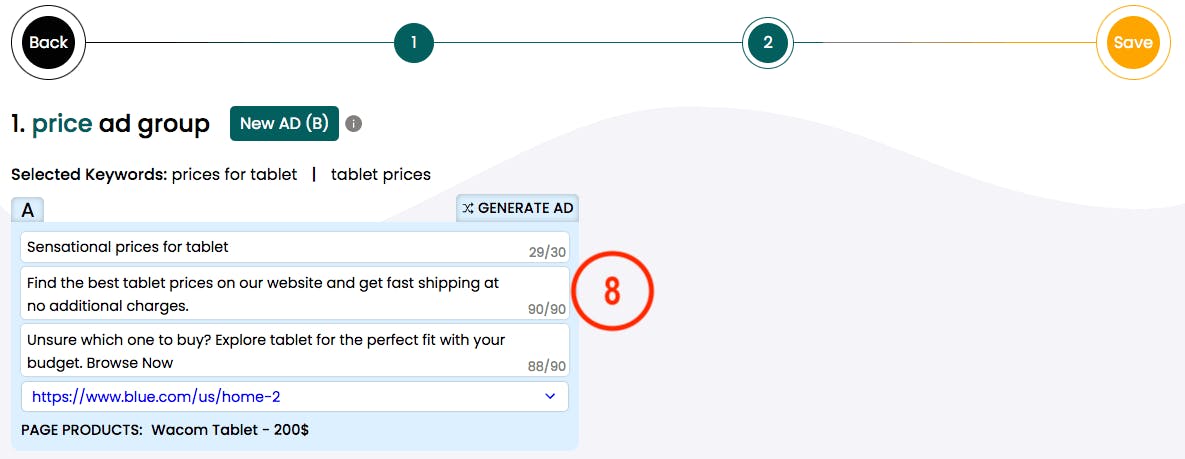
8. Write the headline and description lines for the new ad. See the next section of the Ads Guide for recommendations on how to write an effective ad. Click the Save button. Any settings you make for the new ad group can be changed later, even while the campaign is running.
3.5 Ads
Each campaign must have at least one ad enabled for it to function and produce results. If you have followed all of the previous steps to create an ad campaign, you should have at least one ad for each of your campaigns and ad groups/themes. To get to the following decisions you should open the Ads section from the main dashboard and click on the Ads menu item.
It is recommended to experiment with different ad formats throughout the simulation to find out which ones perform better. Edit the ad to include the name of the product or the search keyword in the ad as well as the benefit or the value provided to a potential customer. Watch out for spelling mistakes. Do not use misleading words and avoid acronyms, excessive punctuation or strange expressions.
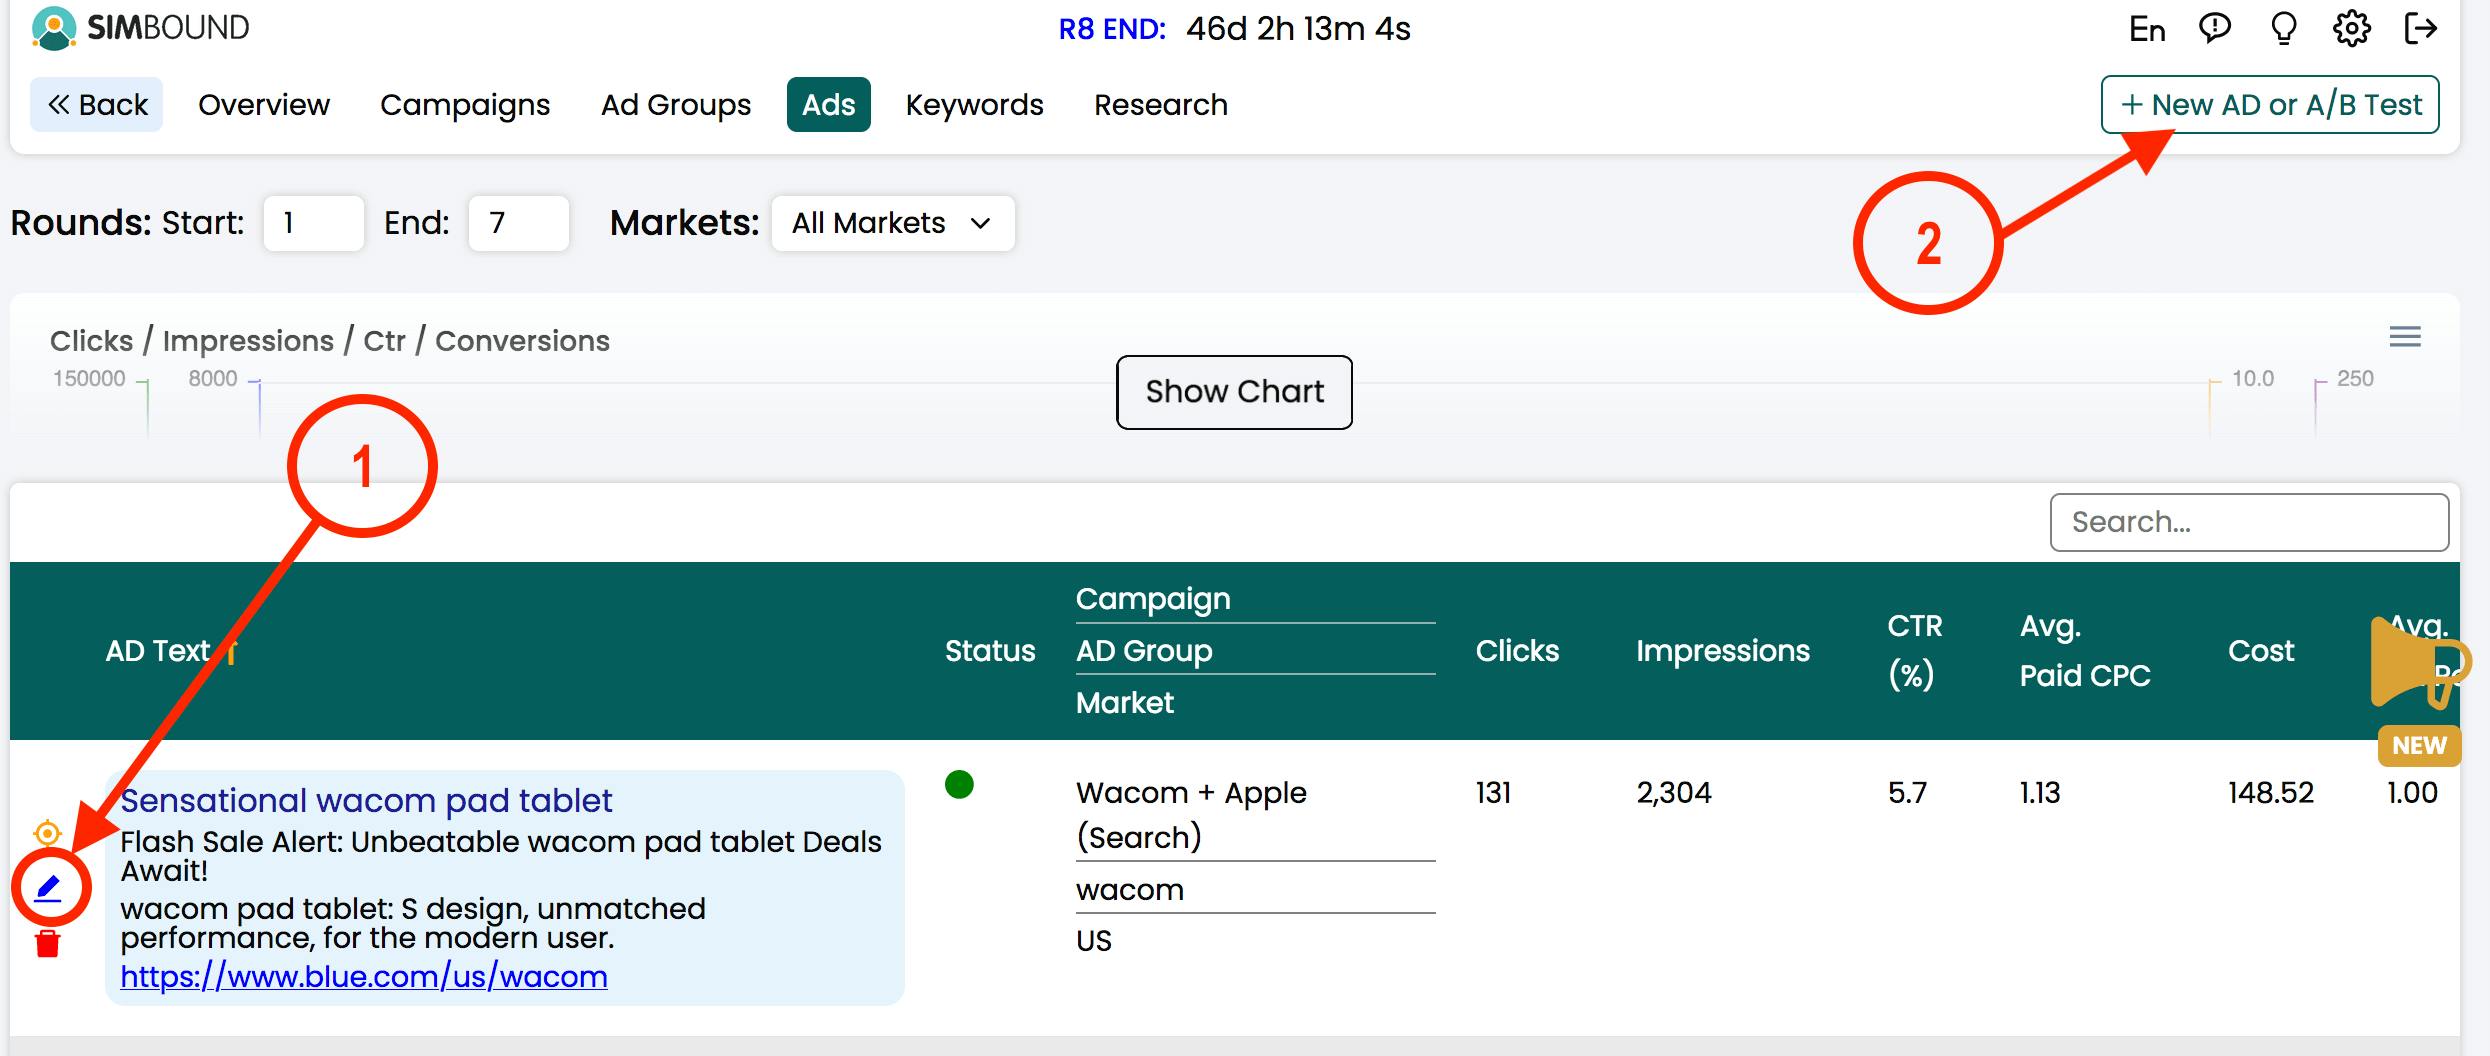
1. You can edit the content of an existing ad by clicking the Edit (pencil) icon to the left of each ad, as shown above.
2. To add a new ad click on the new Ad or A/B Test button. This will bring up several options.
How to create an A/B test
Multiple ads can be ran at the same time for each ad group in order to see which version of an ad performs better. Within Simbound you are allowed to run 2 ads simultaneously for each ad group by means of setting up an A/B test (sometimes called a split test).
3. Select A/B Test and select the campaign and the ad group that contains the ad to test against.
4. Set the exposure amount for each version of the ad. To obtain accurate and easy to compare figures for comparison you will want to set up a 50/50 or what is called an equal distribution. If not sure about the engagement level which the new version of ad will receive then you can allocate less exposure for the B version (or conversely more exposure if you think version B will outperform version A).
5. Write the test version of the ad - this has the label B on top. You can change this several times throughout the simulation and then use the filter of results option to compare results for every version. Please note that the system will only store the latest version of every ad you write.

6. Compare the test results of the ad
Once the round is over, the results of the two versions of the ad can be compared. If the test version of the ad was introduced in a later round, you will need to filter the results to show only the round(s) in which the test was introduced in order to get an accurate comparison. The text of the two versions can be further adjusted if needed.
How to create a Retargeting Ad
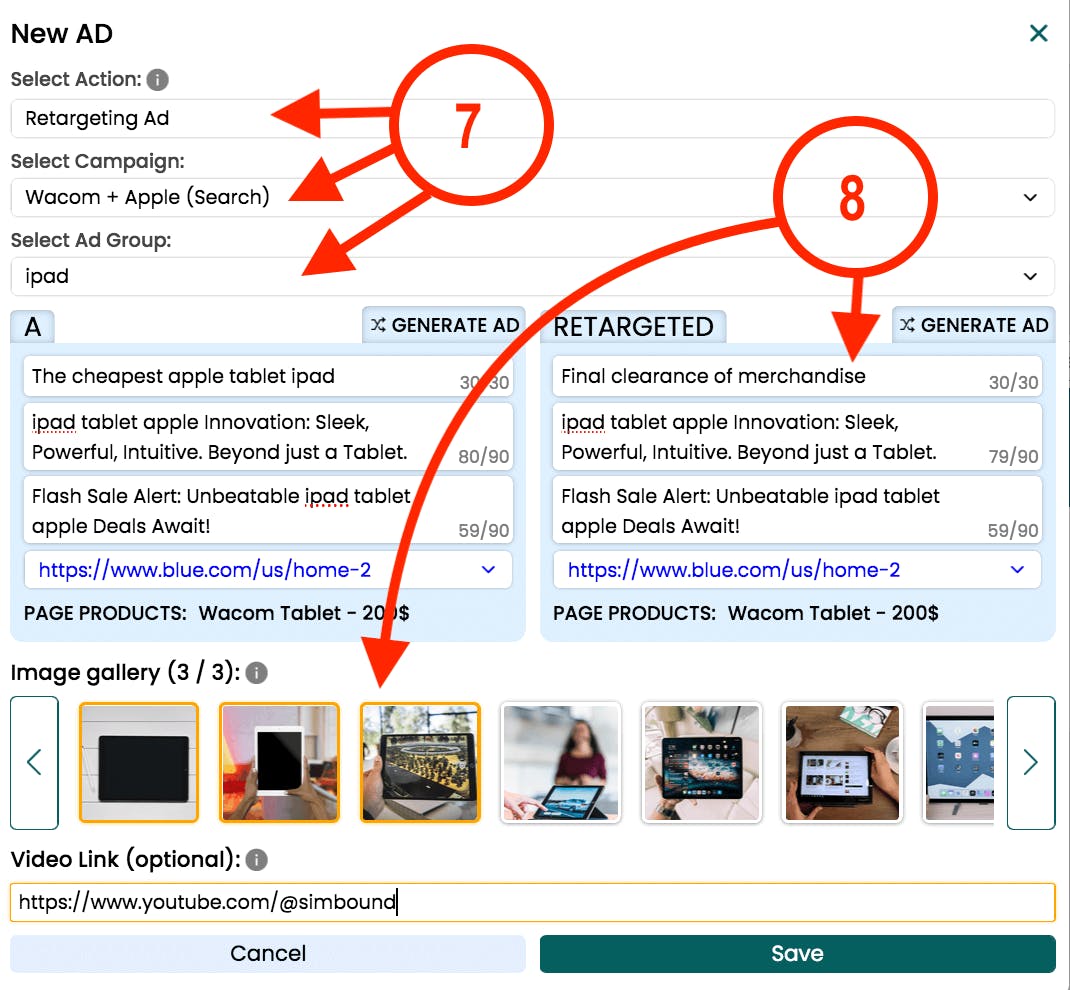
7 First complete Step 2 (above) and then select Retargeting Ad as well as the campaign and the ad group that you want to follow-up on.
8 Write the retargeting ad version and add images and an optional video.
Editing the ad does not erase the data generated by the previous version of the ad. Therefore, you should be aware that the ad performance you see is the result of one or more versions of the ad after changes have been made to the settings of the ads and campaigns that were run throughout the simulation. To get an accurate picture for each round, you can use the Filter Results option.
3.6 Keywords
Selecting the right keywords and managing keywords are essential activities as the ad campaign progresses. The following performance data is made available for each keyword: how many times it has triggered an impression (view), the number of clicks on the associated ad as well as other indicators such as the Click-Through-Rate or CTR (Number of Clicks divided by Number of Impressions, rounded to 2 decimals), the average Cost-per-Click or CPC, the total Cost, the number of Conversions, the Average Ad position and the Keyword Quality score as well as the Gross Value this keyword has genereated in terms of profit.
Add new keywords to an ads campaign:
Access the “Ads” section from the dashboard and click either on the “Keywords” or the “Research” buttons. Please note that the process of browsing and selecting keywords is similar to each of the sections.
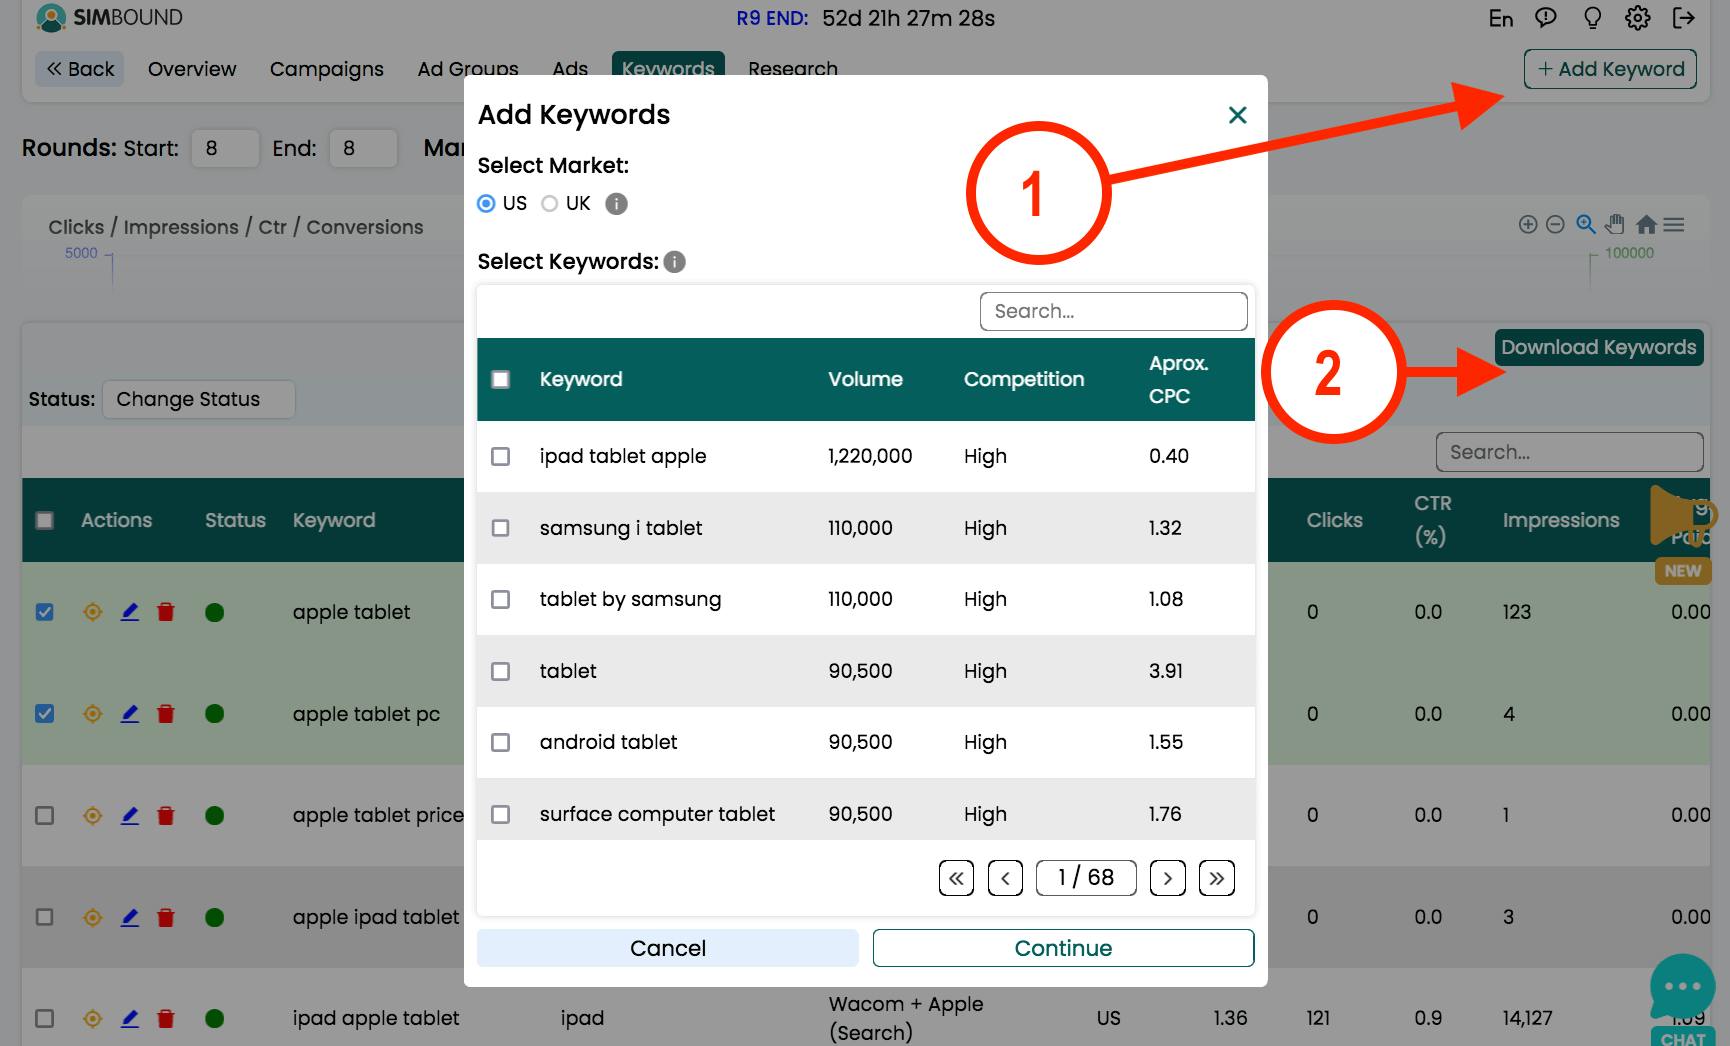
1. Click on the button with the label “Add Keywords” found in the top right and then select the market and the keywords which you will want to target with your existing ads. The filter option can be used to display closely themed and relevant keywords.
Please remember that if one keyword is already part of another campaign for the same market you will not be able to add the keyword to another campaign.
2. Click on the Download Keywords button with if you want to perform additional analysis before adding keywords to the campaigns you have the option of exporting data to a spreadsheet format on both the ‘Keywords’ and the ‘Research’ pages.
How to Edit, Pause or Delete keywords
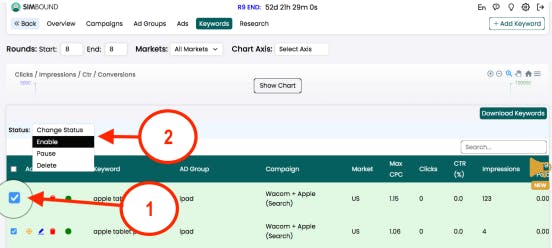
1. Select the Keywords that you want to modify
2. Select either Enable, Pause or Delete
Keyword results can be exported in an spreadsheet format for further data analysis and for appending notes. Go to the Keywords section and look for the Export keywords button.
When choosing on which keywords to remove from your campaigns make sure that there is enough results accumulated so that you can take an informed decision. This normally would involve using data from at least 3 simulation rounds, which have produced results. When deciding which keywords to keep you can perform costbenefit analysis if necessary.
Troubleshooting Ad Campaigns
You might notice a red symbol next to your campaign components such as keywords with the following messages:
‘Ad is not showing, Increase bid or check Ad/Landing Page structure’. This means that the system does not run ads for that particular keyword as it ranks other ads better in terms of engagement and relevancy for virtual visitors. Try a new ad format or increase the bid to match the threshold for the quality score (see the previous subsection on how to do this).
“Overbid” – this means that you are bidding more than you should on this keyword/campaign and that you could obtain similar results with a lower Bid amount